【アップデート】X-RayがOTLPのエンドポイントをサポートするようになりました!
リテールアプリ共創部@大阪の岩田です。
少し前ですが2024/11/22付けのアップデートでX-RayがOTLPのエンドポイントをサポートするようになりました。
このアップデートによって標準化されたプロトコルによってアプリケーションからX-Rayにトレースデータを送信できるようになりました。従来はX-Rayの独自仕様を意識する必要があったのですがSIGv4の認証・認可だけ意識しておけば後はX-Rayの独自仕様を気にすることなくトレースデータの送信が可能です。
環境
今回利用した環境は以下の通りです。
- Node.js: v18.12
- Nest.JS: 9.0.0
- @opentelemetry/sdk-node: 0.55.0
- @opentelemetry/instrumentation-http: 0.55.0
- @opentelemetry/exporter-trace-otlp-http: 0.55.0
- otel/opentelemetry-collector-contrib:0.114.0
やってみる
OTLPのエンドポイントは https://xray.<リージョン>.amazonaws.com/v1/tracesというエンドポイントになります。東京リージョンであればhttps://xray.ap-northeast-1.amazonaws.com/v1/tracesというエンドポイントです。このエンドポイントを使ってアプリケーションからトレースデータを送信してみます。
ちょうど以下のブログを執筆した際の環境が残っていたので、こちらの環境をベースに各種のバージョンだけ微修正して検証してみます。
なおOTLPのエンドポイントを利用するにはTransaction Searchを有効化する必要があります。最初Transaction Searchを有効化していないリージョンで検証していたのですが、OTLPのエンドポイントにリクエストを送ると以下のようなエラーが発生しました。
request to https://xray.ap-northeast-1.amazonaws.com/v1/traces responded with HTTP Status Code 400, Message=The OTLP API is supported with CloudWatch Logs as a Trace Segment Destination. Please enable the CloudWatch Logs destination for your traces using the UpdateTraceSegmentDestination API (https://docs.aws.amazon.com/xray/latest/api/API_UpdateTraceSegmentDestination.html)
この辺りの注意事項はドキュメントにも記載されているので事前にご一読ください。
Troubleshooting - Amazon CloudWatch
実装
まずサンプルアプリのNestJSの実装です。特に大したことはしていません。
import { NestFactory } from '@nestjs/core';
import { AppModule } from './app.module';
import { NodeSDK } from '@opentelemetry/sdk-node';
import { Resource } from '@opentelemetry/resources';
import { OTLPTraceExporter } from '@opentelemetry/exporter-trace-otlp-http';
import { HttpInstrumentation } from '@opentelemetry/instrumentation-http'
import { ATTR_SERVICE_NAME } from '@opentelemetry/semantic-conventions';
import { BatchSpanProcessor } from '@opentelemetry/sdk-trace-base';

const exporterOptions = {
  url: process.env.OTLP_TRACE_ENDPOINT ?? 'http://127.0.0.1:4318/v1/traces',
};
const traceExporter = new OTLPTraceExporter(exporterOptions);

const otelSDK = new NodeSDK({
  resource: new Resource({
    [ATTR_SERVICE_NAME]: 'blog',
  }),
  traceExporter,
  instrumentations: [new HttpInstrumentation()],
  spanProcessor: new BatchSpanProcessor(traceExporter),
});

async function bootstrap() {
  await otelSDK.start();
  const app = await NestFactory.create(AppModule);
  await app.listen(3000);
}
bootstrap();
続いてOTEL Collectorを起動するためのdocker-compose.yamlです。
services:
  otel-collector:
    image: otel/opentelemetry-collector-contrib:0.114.0
    command: ["--config", "/etc/otel-collector-config.yaml"]
    volumes:
      - ./otel-collector-config.yaml:/etc/otel-collector-config.yaml
    ports:
      - '4318:4318'
    environment:
      AWS_ACCESS_KEY_ID: ${AWS_ACCESS_KEY_ID}
      AWS_SECRET_ACCESS_KEY: ${AWS_SECRET_ACCESS_KEY}
      AWS_SESSION_TOKEN: ${AWS_SESSION_TOKEN}
今回はADOT CollectorではなくOpenTelemetry Collector Contribを利用しています。Contribを使用しているのはExporterでAuthenticator - Sigv4のExtensionを利用するためです。バージョンには現時点で最新版の0.114.0を指定しています。volumesにはCollector用の設定ファイルを指定し、外部から設定を渡してやります。
設定ファイルの中身は以下の通りです。
receivers:
  otlp:
    protocols:
      grpc:
        endpoint: 0.0.0.0:4317
      http:
        endpoint: 0.0.0.0:4318

exporters:
  otlphttp:
    traces_endpoint: https://xray.us-east-1.amazonaws.com/v1/traces
    compression: gzip
    auth:
      authenticator: sigv4auth
extensions:
  sigv4auth:
    region: us-east-1
    service: xray
service:
  extensions: [sigv4auth]
  pipelines:
    traces:
      receivers: [otlp]
      exporters: [otlphttp]
extensionsでsigv4authを指定している以外は非常にシンプルな設定ファイルです。これだけでX-Rayにトレースデータが送信できるようになったので、昔に比べるととても楽チンですね。
動作確認
準備ができたのでdocker-compose upでOTEL Collectorを起動します。AWSのクレデンシャル情報はdocker-composeを実行するシェルの環境変数経由で渡す構成にしているので、事前にawsumeなどで環境変数を設定しておいてください。
docker-compose up
[+] Running 2/1
 ✔ Network blog_default             Created                                                                                                                                                                                                   0.1s
 ✔ Container blog-otel-collector-1  Created                                                                                                                                                                                                   0.0s
Attaching to otel-collector-1
otel-collector-1  | 2024-12-02T09:17:36.820Z	info	[email protected]/service.go:166	Setting up own telemetry...
otel-collector-1  | 2024-12-02T09:17:36.820Z	info	telemetry/metrics.go:70	Serving metrics	{"address": "localhost:8888", "metrics level": "Normal"}
otel-collector-1  | 2024-12-02T09:17:36.821Z	info	[email protected]/service.go:238	Starting otelcol-contrib...	{"Version": "0.114.0", "NumCPU": 2}
otel-collector-1  | 2024-12-02T09:17:36.821Z	info	extensions/extensions.go:39	Starting extensions...
otel-collector-1  | 2024-12-02T09:17:36.821Z	info	extensions/extensions.go:42	Extension is starting...	{"kind": "extension", "name": "sigv4auth"}
otel-collector-1  | 2024-12-02T09:17:36.821Z	info	extensions/extensions.go:59	Extension started.	{"kind": "extension", "name": "sigv4auth"}
otel-collector-1  | 2024-12-02T09:17:36.822Z	warn	[email protected]/warning.go:40	Using the 0.0.0.0 address exposes this server to every network interface, which may facilitate Denial of Service attacks.	{"kind": "receiver", "name": "otlp", "data_type": "traces", "documentation": "https://github.com/open-telemetry/opentelemetry-collector/blob/main/docs/security-best-practices.md#safeguards-against-denial-of-service-attacks"}
otel-collector-1  | 2024-12-02T09:17:36.822Z	info	[email protected]/otlp.go:112	Starting GRPC server	{"kind": "receiver", "name": "otlp", "data_type": "traces", "endpoint": "0.0.0.0:4317"}
otel-collector-1  | 2024-12-02T09:17:36.822Z	warn	[email protected]/warning.go:40	Using the 0.0.0.0 address exposes this server to every network interface, which may facilitate Denial of Service attacks.	{"kind": "receiver", "name": "otlp", "data_type": "traces", "documentation": "https://github.com/open-telemetry/opentelemetry-collector/blob/main/docs/security-best-practices.md#safeguards-against-denial-of-service-attacks"}
otel-collector-1  | 2024-12-02T09:17:36.822Z	info	[email protected]/otlp.go:169	Starting HTTP server	{"kind": "receiver", "name": "otlp", "data_type": "traces", "endpoint": "0.0.0.0:4318"}
otel-collector-1  | 2024-12-02T09:17:36.822Z	info	[email protected]/service.go:261	Everything is ready. Begin running and processing data.
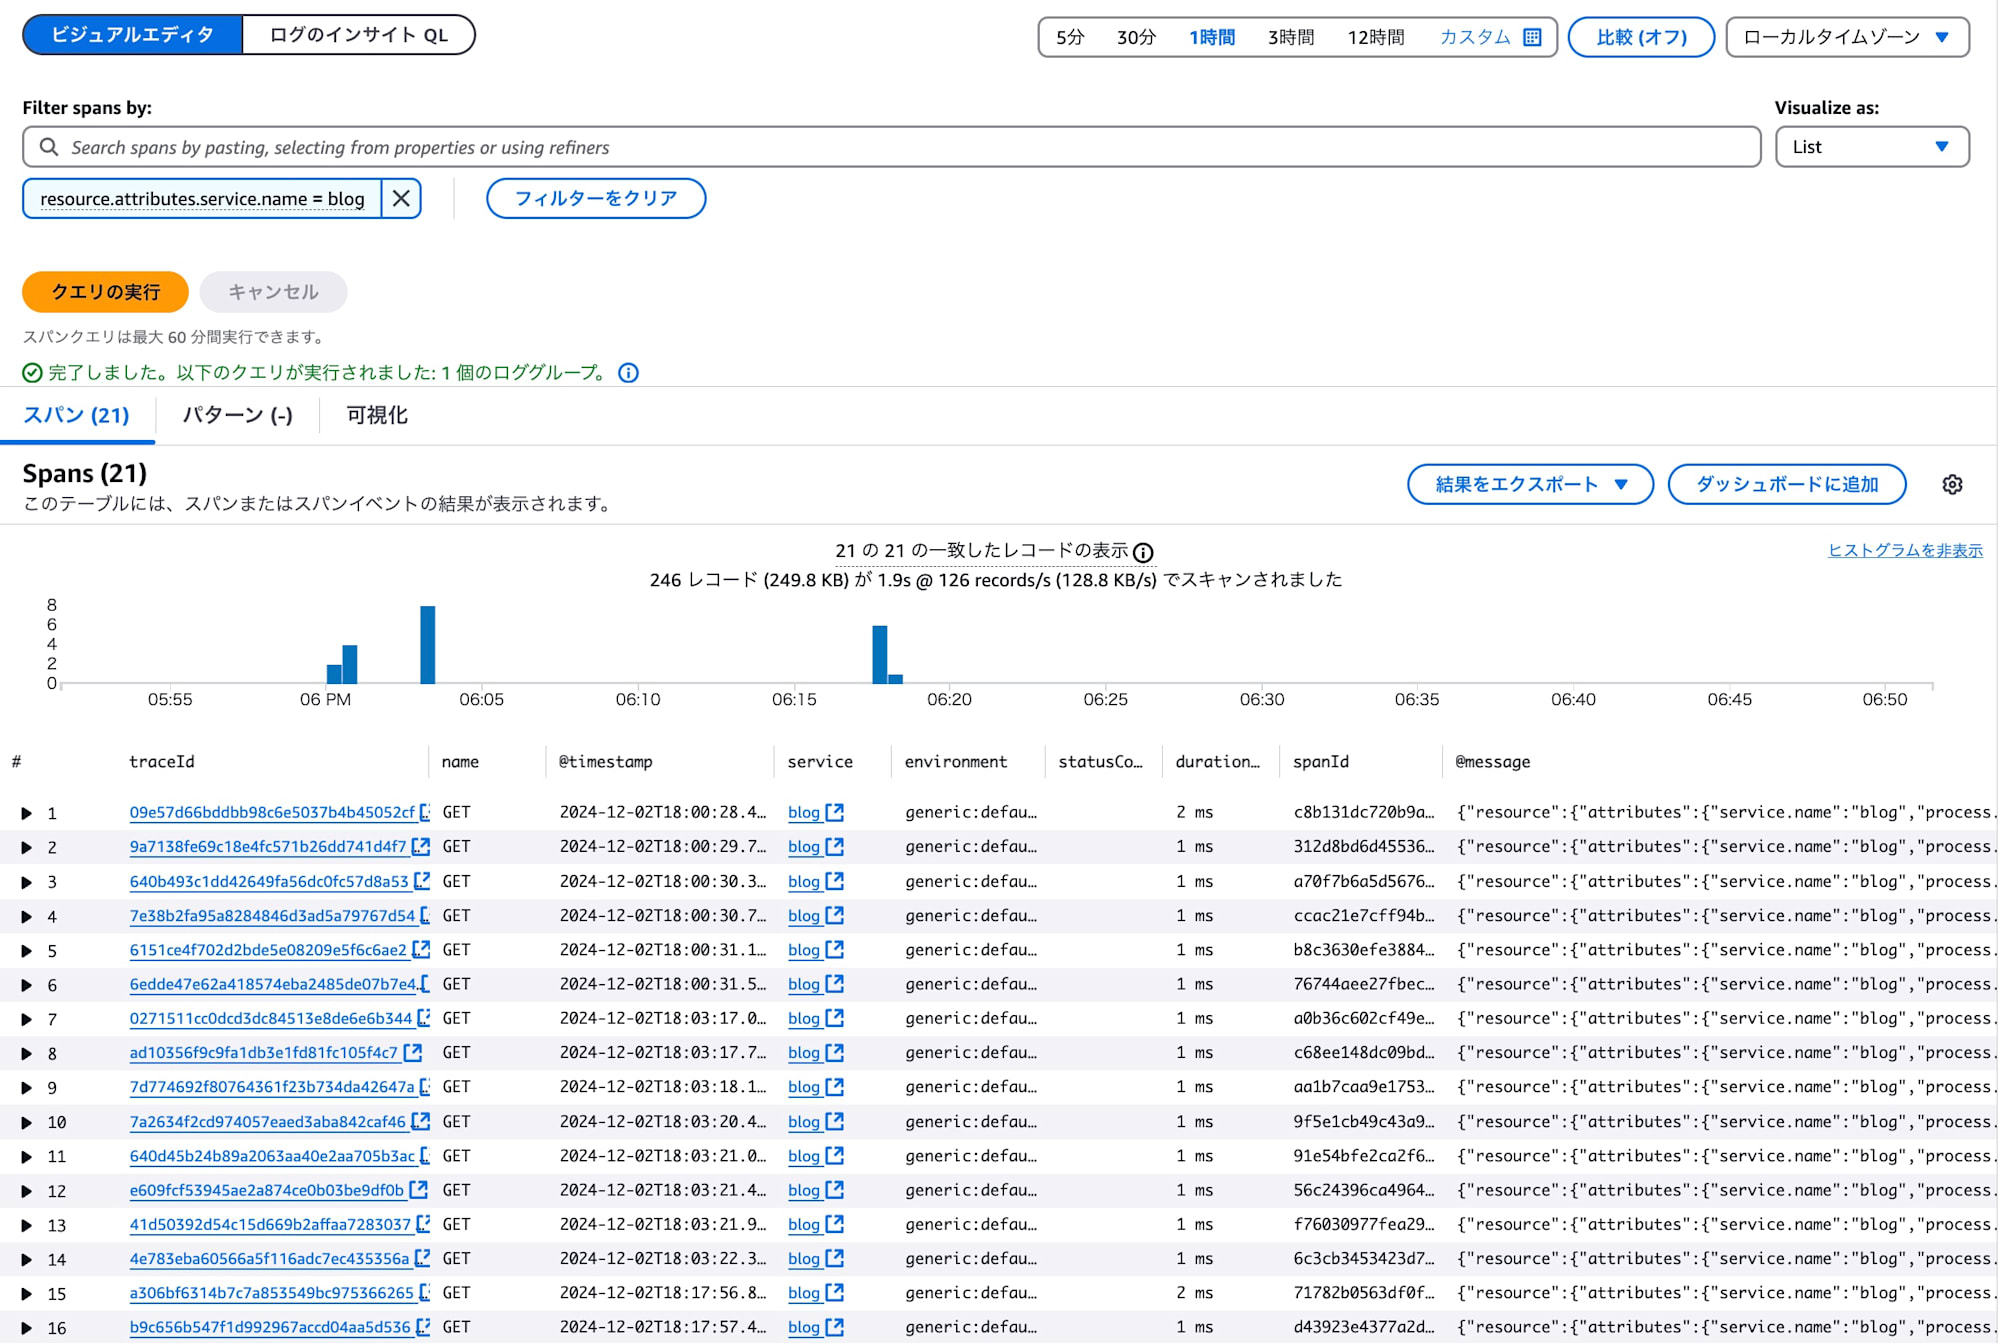
続いてnpm run startでNestJSのアプリを起動し、Curlでアクセスします。そのまましばらく待つと...

無事にマネコンからトレースデータが確認できました!
まとめ
X-Rayは昨年11月にW3C形式のトレースIDに対応しましたが、それに続いてよりOTEL標準に寄っていくようなアップデートですね。X-Ray独自仕様をほとんど意識することなくトレースデータが送信できるようになったので、よりX-Rayが気軽に使いやすくなったのではないでしょうか?Transaction Searchと合わせて有効活用していきましょう。

![[アップデート]Amazon CloudWatch のテレメトリ設定を集中的に可視化できるようになりました #AWSreInvent](https://images.ctfassets.net/ct0aopd36mqt/3nibOl2sZ0LKJueI0FHFi5/14de7bd294f7916a28b789105c60d450/reinvent-2024-newservice-jp.jpg)

![[レポート]CloudWatchを使った優れたオブザーバビリティ設定を学べるワークショップ「Hands-on experience with Amazon CloudWatch」に参加しました #AWSreInvent #COP303](https://images.ctfassets.net/ct0aopd36mqt/3IQLlbdUkRvu7Q2LupRW2o/edff8982184ea7cc2d5efa2ddd2915f5/reinvent-2024-sessionreport-jp.jpg)


