Ubuntu 24.04 LTS で KVM の実行環境を構築してみた
はじめに
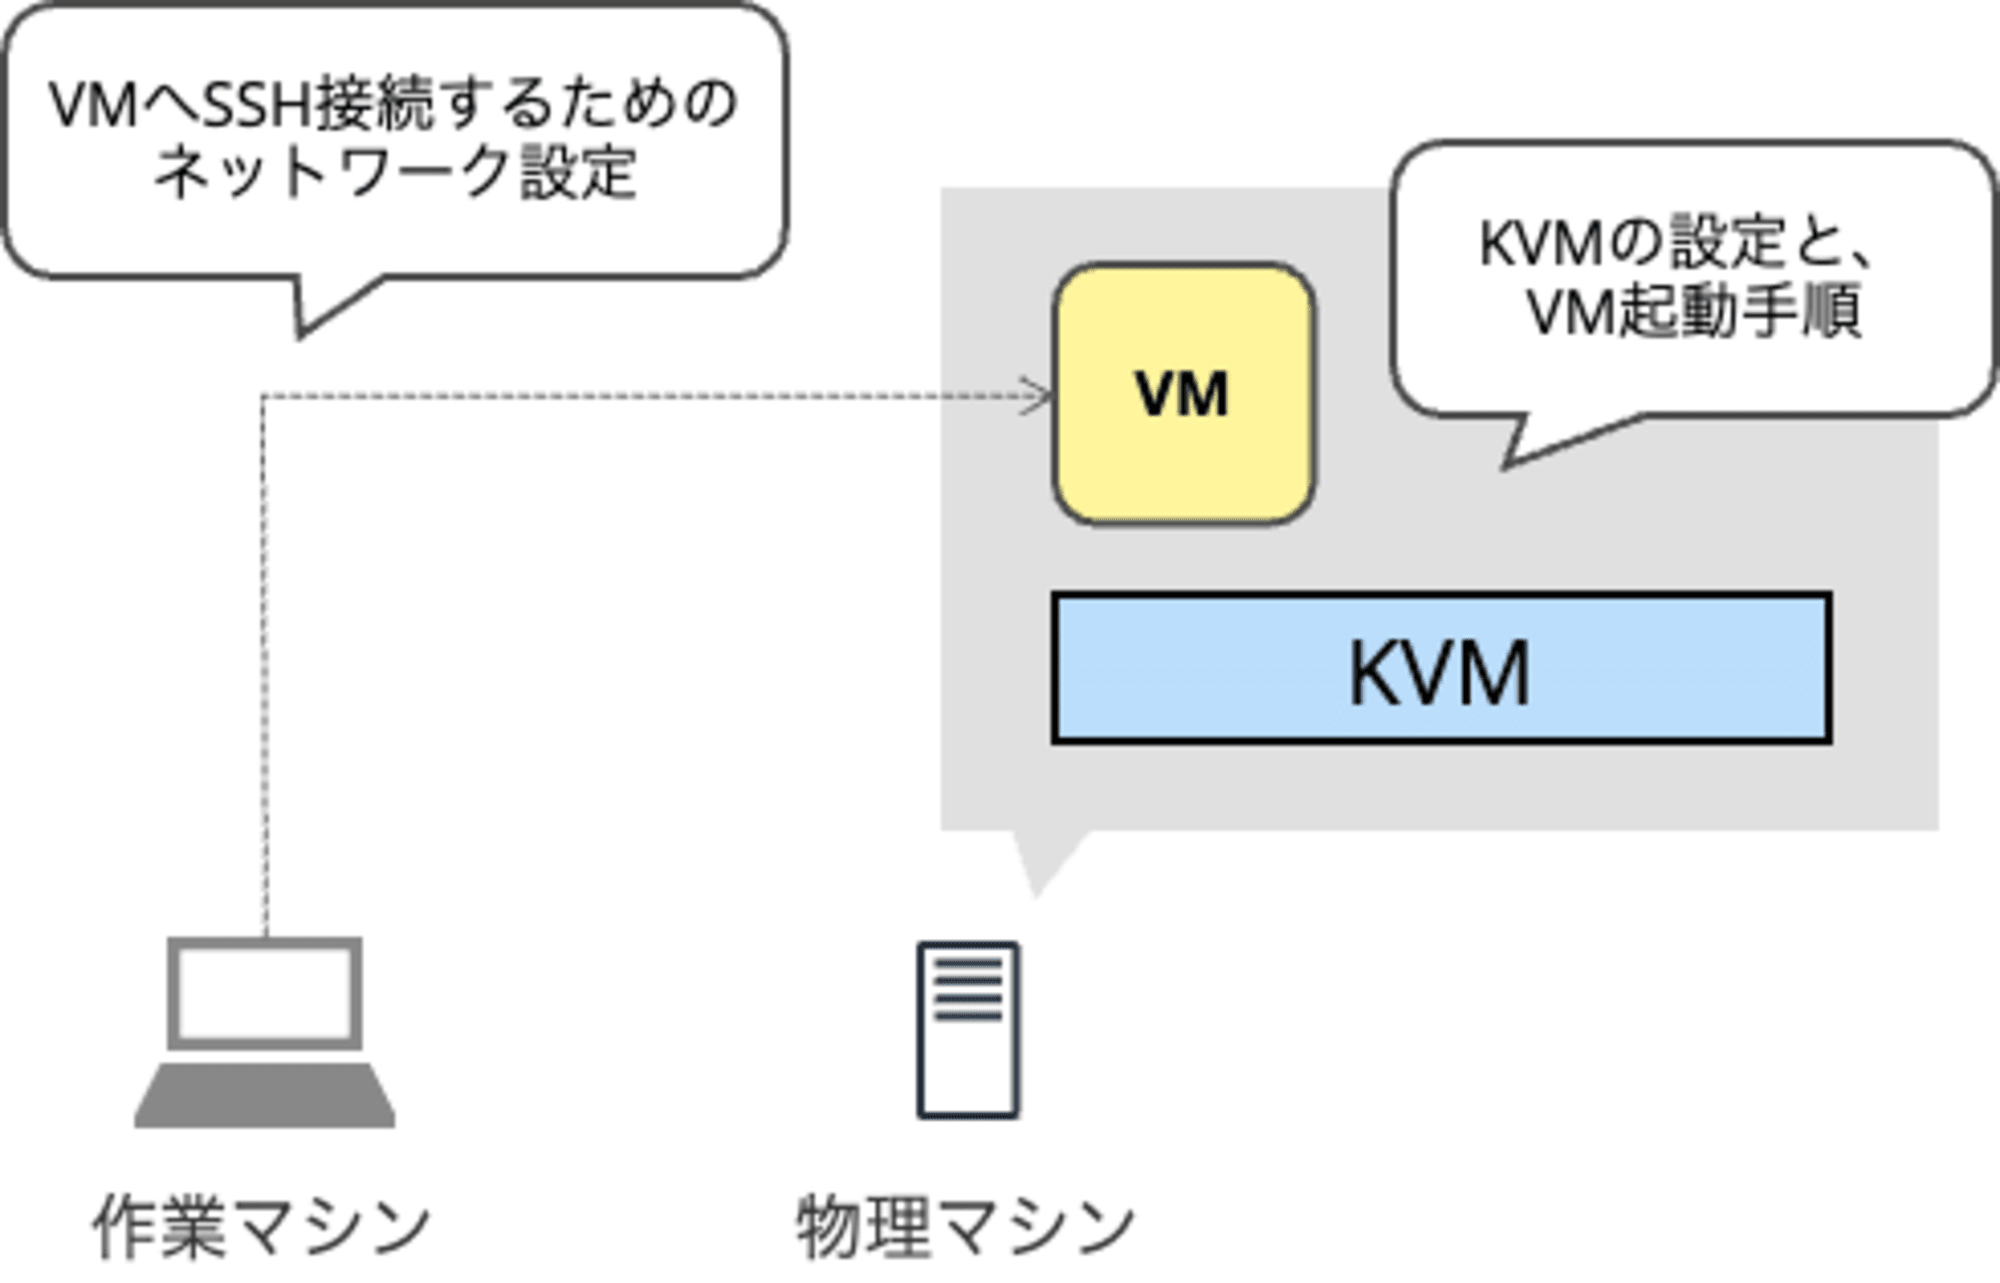
KVM(Kernel-based Virtual Machine)は、Linux カーネルに組み込まれた仮想化ソリューションです。本記事では、Ubuntu 24.04 LTS 上で KVM を設定し、仮想マシンを作成するまでの手順を残しておきます。

検証環境
2019 年頃の物理マシンを使用しました。EC2 ですと KVM の検証はできないですからね。
| 項目 | 詳細 |
|---|---|
| CPU | AMD Ryzen 5 2400G |
| メモリ | 16GB DDR4-2666 |
| ストレージ | Samsung SSD 250GB 850 EVO |
| OS | Ubuntu 24.04.1 LTS |
インストール手順は主に以下の記事を参考にさせていただきました。
- KVM/Installation - Community Help Wiki
- Ubuntu 22.04 LTS : KVM : インストール : Server World
- Ubuntu 22.04 LTS : KVM : 仮想マシンを作成する : Server World
KVM のインストール
まず、KVM とその関連パッケージをインストールします。
sudo apt install qemu-kvm libvirt-daemon-system libvirt-daemon virtinst bridge-utils libosinfo-bin -y
インストール後、KVM の動作を確認します。以下の表示は、KVM 仮想化とアクセラレーションが使用可能であることを示しています。
$ kvm-ok
INFO: /dev/kvm exists
KVM acceleration can be used
ネットワーク設定
KVM のデフォルトネットワーク(virbr0)を削除し、新しいブリッジを作成します。これは、外部端末から SSH 接続を可能にするためです。デフォルトのブリッジではホスト以外からの接続ができません。
デフォルトブリッジの削除
現在のネットワーク状況を確認します。
$  nmcli device
DEVICE          TYPE      STATE            CONNECTION
enp3s0          ethernet  接続済み         有線接続 1
wlp2s0          wifi      接続済み         Nipopo-Wifi
lo              loopback  接続済み (外部)  lo
virbr0          bridge    接続済み (外部)  virbr0
KVM のデフォルトネットワーク(virbr0)を削除します。
$ sudo virsh net-destroy default
Network default destroyed

$ sudo virsh net-undefine default
Network default has been undefined
KVM のデフォルトネットワーク(virbr0)は削除されました。
$ nmcli device
DEVICE          TYPE      STATE            CONNECTION
enp3s0          ethernet  接続済み         有線接続 1
wlp2s0          wifi      接続済み         Nipopo-Wifi
lo              loopback  接続済み (外部)  lo
新しいブリッジの作成
Netplan を使用して新しいブリッジを作成します。以下の内容で /etc/netplan/1_kvm.yaml ファイルを作成します。
物理ネットワークインターフェース(enp3s0)をブリッジ(br0)に接続し、静的 IP アドレスを設定します。
network:
  version: 2
  ethernets:
    enp3s0:
      dhcp4: false
      dhcp6: false
  bridges:
    br0:
      interfaces: [enp3s0]
      addresses: [192.168.20.160/24]
      routes:
        - to: default
          via: 192.168.20.1
      nameservers:
        addresses: [1.1.1.1, 8.8.8.8]
      parameters:
        stp: false
      dhcp4: false
      dhcp6: false
デフォルトゲートウェイの確認は、すでに同じネットワーク内に属していればip routeコマンドの確認できます。default viaに表示される IP アドレスをroutes:の設定値としてください。
$ ip route
default via 192.168.20.1 dev wlp2s0 proto dhcp src 192.168.20.221 metric 600
192.168.20.0/24 dev wlp2s0 proto kernel scope link src 192.168.20.221 metric 600
ファイルのパーミッションを修正し、Netplan を適用します。
$ sudo chmod 600 /etc/netplan/1_kvm.yaml
$ sudo netplan apply
設定が正しく適用されたか確認します。新しいブリッジ(br0)が正しく作成され、物理インターフェースと接続されていることを確認できます。
$ nmcli device
DEVICE          TYPE      STATE            CONNECTION
br0             bridge    接続済み         netplan-br0
wlp2s0          wifi      接続済み         Nipopo-Wifi
enp3s0          ethernet  接続済み         netplan-enp3s0
lo              loopback  接続済み (外部)  lo

$ brctl show
bridge name	bridge id		STP enabled	interfaces
br0		8000.4ac2659af54c	no		enp3s0
仮想マシン作成と起動
Ubuntu Server 24.04 LTS を仮想マシンとして起動させて動作確認します。
OS イメージの取得
Ubuntu 24.04 LTS の ISO イメージをダウンロードし、KVM の規定ディレクトリに移動します。
wget https://releases.ubuntu.com/24.04.1/ubuntu-24.04.1-live-server-amd64.iso
sudo mv ubuntu-24.04.1-live-server-amd64.iso /var/lib/libvirt/images
ストレージ設定の確認
KVM のストレージプールを確認します。
$ sudo virsh pool-list --all
 Name     State    Autostart
------------------------------
 images   active   yes
/var/lib/libvirt/images/配下にゲスト OS のディスクを作成することにします。
仮想マシンの起動
以下のコマンドを使用して、2 つの vCPU、2GB の RAM、20GB のディスクを持つ仮想マシンを作成します。また、先ほど作成したブリッジ(br0)を使用してネットワークを設定し、グラフィカルインターフェースなしでシリアルコンソール経由でインストールを行います。
sudo virt-install \
    --name ubuntu2404 \
    --vcpus 2 \
    --ram 2048 \
    --disk path=/var/lib/libvirt/images/ubuntu2404.img,size=20 \
    --os-variant ubuntu24.04 \
    --network bridge=br0 \
    --graphics none \
    --console pty,target_type=serial \
    --location /var/lib/libvirt/images/ubuntu-24.04.1-live-server-amd64.iso,kernel=casper/vmlinuz,initrd=casper/initrd \
    --extra-args 'console=ttyS0,115200n8 serial'
OS のインストール
シリアルコンソールで接続している状態のため、インストーラーの起動画面を確認できます。
================================================================================
  Serial                                                              [ Help ]
================================================================================

  As the installer is running on a serial console, it has started in basic
  mode, using only the ASCII character set and black and white colours.

  If you are connecting from a terminal emulator such as gnome-terminal that
  supports unicode and rich colours you can switch to "rich mode" which uses
  unicode, colours and supports many languages.

  You can also connect to the installer over the network via SSH, which will
  allow use of rich mode.

                          [ Continue in rich mode  > ]
                          [ Continue in basic mode > ]
                          [ View SSH instructions    ]
画面の指示に従って OS のインストールを完了させます。インストール待ちが懐かしく感じました。その間にこのブログを書き進めることができました。
▄▄▄▄▄▄▄▄▄▄▄▄▄▄▄▄▄▄▄▄▄▄▄▄▄▄▄▄▄▄▄▄▄▄▄▄▄▄▄▄▄▄▄▄▄▄▄▄▄▄▄▄▄▄▄▄▄▄▄▄▄▄▄▄▄▄▄▄▄▄▄▄▄▄▄▄▄▄▄▄
  Installing system                                                   [ Help ]
▀▀▀▀▀▀▀▀▀▀▀▀▀▀▀▀▀▀▀▀▀▀▀▀▀▀▀▀▀▀▀▀▀▀▀▀▀▀▀▀▀▀▀▀▀▀▀▀▀▀▀▀▀▀▀▀▀▀▀▀▀▀▀▀▀▀▀▀▀▀▀▀▀▀▀▀▀▀▀▀
  ┌──────────────────────────────────────────────────────────────────────────┐
  │     curtin command extract                                              ▴│
  │      acquiring and extracting image from cp:///tmp/tmpo51qis83/mount     │
  │ configuring keyboard                                                     │
  │  curtin command in-target                                                │
  │ executing curtin install curthooks step                                  │
  │  curtin command install                                                  │
  │   configuring installed system                                           │
  │    running 'curtin curthooks'                                            │
  │     curtin command curthooks                                             │
  │      configuring apt configuring apt                                     │
  │      installing missing packages                                         │
  │      Installing packages on target system: ['grub-pc']                   │
  │      configuring iscsi service                                           │
  │      configuring raid (mdadm) service                                    │
  │      configuring NVMe over TCP                                          █│
  │      installing kernel \                                                ▾│
  └──────────────────────────────────────────────────────────────────────────┘

                               [ View full log ]
最後の指示に従って仮想マシンのリブート後、ログインできました。
Ubuntu 24.04.1 LTS ubuntuonkvm ttyS0

ubuntuonkvm login: ohmura
Password:
Welcome to Ubuntu 24.04.1 LTS (GNU/Linux 6.8.0-47-generic x86_64)

 * Documentation:  https://help.ubuntu.com
 * Management:     https://landscape.canonical.com
 * Support:        https://ubuntu.com/pro

This system has been minimized by removing packages and content that are
not required on a system that users do not log into.

To restore this content, you can run the 'unminimize' command.

The programs included with the Ubuntu system are free software;
the exact distribution terms for each program are described in the
individual files in /usr/share/doc/*/copyright.

Ubuntu comes with ABSOLUTELY NO WARRANTY, to the extent permitted by
applicable law.

To run a command as administrator (user "root"), use "sudo <command>".
See "man sudo_root" for details.

ohmura@ubuntuonkvm:~$
この後、外部端末からのアクセステストのために SSH 接続します。そのための準備をします。まず、sshd が停止していたので起動させます。
$ sudo systemctl status ssh
○ ssh.service - OpenBSD Secure Shell server
     Loaded: loaded (/usr/lib/systemd/system/ssh.service; disabled; preset: enabled)
     Active: inactive (dead)
TriggeredBy: ● ssh.socket
       Docs: man:sshd(8)
             man:sshd_config(5)

$ sudo systemctl start ssh

$ sudo systemctl status ssh
● ssh.service - OpenBSD Secure Shell server
     Loaded: loaded (/usr/lib/systemd/system/ssh.service; disabled; preset: enabled)
     Active: active (running) since Sun 2024-10-27 00:57:49 UTC; 1s ago
TriggeredBy: ● ssh.socket
       Docs: man:sshd(8)
             man:sshd_config(5)
    Process: 1056 ExecStartPre=/usr/sbin/sshd -t (code=exited, status=0/SUCCESS)
   Main PID: 1058 (sshd)
      Tasks: 1 (limit: 2276)
     Memory: 2.1M (peak: 2.1M)
        CPU: 48ms
     CGroup: /system.slice/ssh.service
             └─1058 "sshd: /usr/sbin/sshd -D [listener] 0 of 10-100 startups"
NIC のプライベート IP アドレスを確認しておきます。
$ ip a
1: lo: <LOOPBACK,UP,LOWER_UP> mtu 65536 qdisc noqueue state UNKNOWN group default qlen 1000
    link/loopback 00:00:00:00:00:00 brd 00:00:00:00:00:00
    inet 127.0.0.1/8 scope host lo
       valid_lft forever preferred_lft forever
    inet6 ::1/128 scope host noprefixroute
       valid_lft forever preferred_lft forever
2: enp1s0: <BROADCAST,MULTICAST,UP,LOWER_UP> mtu 1500 qdisc pfifo_fast state UP group default qlen 1000
    link/ether 52:54:00:43:34:d1 brd ff:ff:ff:ff:ff:ff
    inet 192.168.20.126/24 metric 100 brd 192.168.20.255 scope global dynamic enp1s0
       valid_lft 7153sec preferred_lft 7153sec
    inet6 240b:13:91a0:7d00:5054:ff:fe43:34d1/64 scope global dynamic mngtmpaddr noprefixroute
       valid_lft 296sec preferred_lft 296sec
    inet6 fe80::5054:ff:fe43:34d1/64 scope link
       valid_lft forever preferred_lft forever
コンソール画面から抜けました。KVM のホストマシンから仮想マシンの起動状況を念のため確認します。起動しているため問題ありません。
$ sudo virsh list
 Id   Name         State
----------------------------
 2    ubuntu2404   running
外部端末から SSH 接続
確認したプライベート IP アドレスに SSH 接続します。問題なく接続できました。新しく作成したブリッジ設定も問題ありませんでした。
$ ssh [email protected]
[email protected]'s password:
Welcome to Ubuntu 24.04.1 LTS (GNU/Linux 6.8.0-47-generic x86_64)

 * Documentation:  https://help.ubuntu.com
 * Management:     https://landscape.canonical.com
 * Support:        https://ubuntu.com/pro

This system has been minimized by removing packages and content that are
not required on a system that users do not log into.

To restore this content, you can run the 'unminimize' command.
ohmura@ubuntuonkvm:~$
仮想マシンのシャットダウン
動作確認のために作成した仮想マシンでしたのでシャットダウンしておきます。
$ sudo virsh shutdown ubuntu2404
Domain 'ubuntu2404' is being shutdown

$ sudo virsh list --all
 Id   Name         State
-----------------------------
 -    ubuntu2404   shut off
まとめ
本記事では、Ubuntu 24.04 LTS 上で KVM を設定し、仮想マシンを作成する手順を紹介しました。主なポイントは以下の通りです。
- KVM と関連パッケージのインストール
- ネットワーク設定の変更(デフォルトブリッジの削除と新しいブリッジの作成)
- 仮想マシンの作成と OS のインストール
- 外部端末からの SSH 接続確認
これらの手順で、KVM を使用した基本的な仮想化環境を構築できます。
おわりに
10 年ぶりに KVM を使いました。ネットワーク設定変えないといけないことは覚えていたけど具体的に何をいじるのかはサッパリ覚えていませんでした。良い復習の機会となりました。


