Amplify Gen2でAppSyncのMutationを実行するLambda関数を作成してみた
はじめに
コンサル部の神野です。
前回の記事では、Amplify Gen2を使ってリアルタイムサブスクリプションを実装しました。
その際にAWSコンソール上からデータソースを更新しましたが、実際のアプリケーションでは、ストリーミングデータをLambda関数で取得し、AppSyncへ更新処理を実行して画面を更新したいケースがあると思います。
そこで今回は、Lambda関数からAppSyncの更新処理を行うMutationを実行して、データを更新する方法を紹介します。
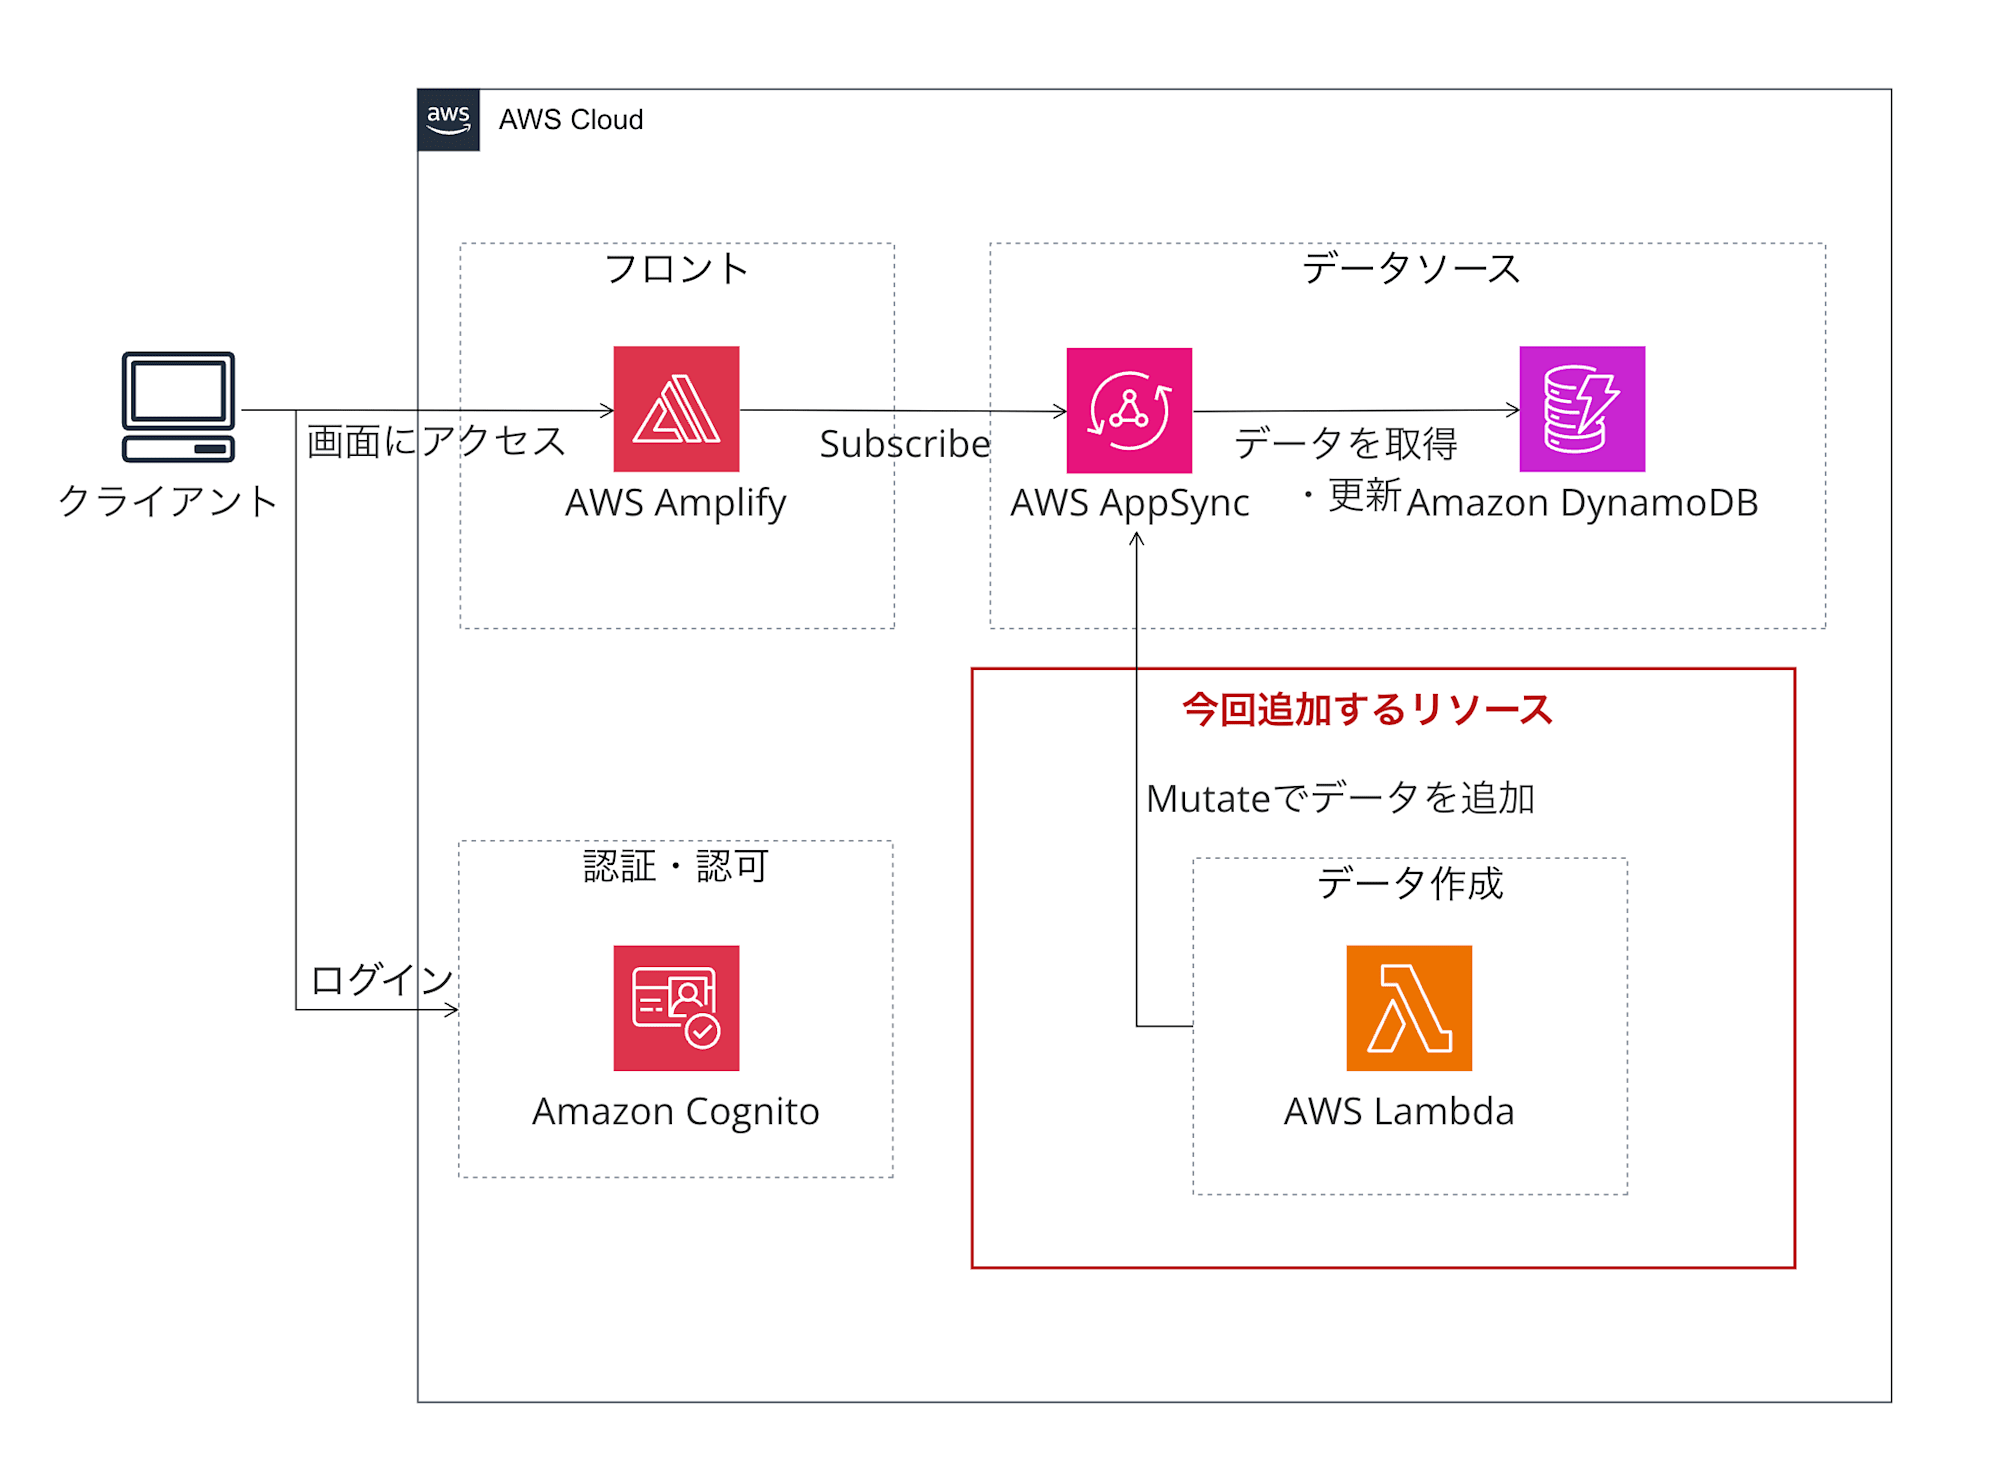
構成するシステム構成図
Lambda関数からAppSyncのMutationを実行し、DynamoDBのデータを更新します。
更新されたデータは、前回実装したサブスクリプション機能によってリアルタイムに画面に反映されます。
今回はこのLambda関数を追加していきます。

前提
前回の記事の内容が実装されていることとします。
前回および今回のソースコードはGithub上にアップロードしていますので、必要に応じてご参照ください。
前回のソースコード
今回のソースコード
Lambda関数の実装
ライブラリインストール
Lambda関数で使用するライブラリをインストールしておきます。
今回はHTTPライブラリAxiosやAWS Signature v4を使うのでその周りのライブラリをインストールします。
npm install @aws-crypto/sha256-universal @aws-sdk/signature-v4 @aws-sdk/client-appsync axios
Lambda関数の作成
amplify/functionsディレクトリ配下にLambda関数を作成します。
ディレクトリ構成としては下記となります。
amplify/
├── functions/
│   └── data-access/
│       ├── handler.ts
│       └── resource.ts
└── backend.ts
handler.ts
まずはhandler.tsファイルに関数の処理を実装していきます。
コード全体
コード全体
import { defaultProvider } from "@aws-sdk/credential-provider-node";
import axios from "axios";
import { SignatureV4 } from "@aws-sdk/signature-v4";
import { Sha256 } from "@aws-crypto/sha256-universal";

// AppSync Mutationの入力型定義
type DeviceStatusInput = {
  device_Id: string;
  humidity: number;
  temperature: number;
  voltage: string;
  last_updated: string;
  status_code: string;
  status_description: string;
  status_state: string;
};

type CreateDeviceStatusVariables = {
  input: DeviceStatusInput;
};

const CREATE_DEVICE_STATUS = `
  mutation CreateDeviceStatus($input: CreateDeviceStatusInput!) {
    createDeviceStatus(input: $input) {
      id
      device_Id
      humidity
      temperature
      voltage
      last_updated
      status_code
      status_description
      status_state
      createdAt
      updatedAt
    }
  }
`;

async function createSignedRequest(query: string, variables: CreateDeviceStatusVariables) {
  const url = new URL(process.env.APPSYNC_ENDPOINT!);
  const body = { query, variables };

  const request = {
    headers: {
      "Content-Type": "application/json",
      host: url.hostname,
    },
    hostname: url.hostname,
    method: "POST",
    path: url.pathname,
    protocol: url.protocol,
    body: JSON.stringify(body),
  };

  const signer = new SignatureV4({
    credentials: defaultProvider(),
    region: process.env.REGION || "ap-northeast-1",
    service: "appsync",
    sha256: Sha256,
  });

  return { signedRequest: await signer.sign(request), body };
}

function getRandomNumber(
  min: number,
  max: number,
  decimals: number = 1
): number {
  return Number((Math.random() * (max - min) + min).toFixed(decimals));
}

function getRandomDeviceId(): string {
  return `device_${String(Math.floor(Math.random() * 100)).padStart(3, "0")}`;
}

export const handler = async (event: any) => {
  try {
    if (!process.env.APPSYNC_ENDPOINT) {
      throw new Error("APPSYNC_ENDPOINT environment variable is not set");
    }

    const variables = {
      input: {
        device_Id: getRandomDeviceId(), // device_001 ~ device_099
        humidity: getRandomNumber(30, 80, 1), // 30.0 ~ 80.0
        temperature: getRandomNumber(15, 35, 1), // 15.0 ~ 35.0
        voltage: getRandomNumber(11, 13, 1).toString(), // "11.0" ~ "13.0"
        last_updated: new Date().toISOString(),
        status_code: "200",
        status_description: "Normal operation",
        status_state: "NORMAL",
      },
    };

    const { signedRequest, body } = await createSignedRequest(
      CREATE_DEVICE_STATUS,
      variables
    );

    const response = await axios.post(
      `${signedRequest.protocol}//${signedRequest.hostname}${signedRequest.path}`,
      body,
      {
        headers: signedRequest.headers,
      }
    );

    return {
      statusCode: 200,
      body: JSON.stringify(response.data),
    };
  } catch (error) {
    console.error("Error:", error);
    return {
      statusCode: 500,
      body: JSON.stringify({ error: error.message }),
    };
  }
};
要点
全体は長いので要点をピックアップして説明させていただきます。
-
GraphQL Mutationの定義
- AppSyncにデータを作成するためのMutation操作を定義します。
createDeviceStatusがAmplifyで自動生成されているため使用します。
- 入力型とクエリ文字列を用意し、必要なフィールドを指定します。
type DeviceStatusInput = { device_Id: string; humidity: number; temperature: number; voltage: string; last_updated: string; status_code: string; status_description: string; status_state: string; }; const CREATE_DEVICE_STATUS = ` mutation CreateDeviceStatus($input: CreateDeviceStatusInput!) { createDeviceStatus(input: $input) { id device_Id humidity temperature voltage last_updated status_code status_description status_state createdAt updatedAt } } `; - AppSyncにデータを作成するためのMutation操作を定義します。
-
AWS Signature V4による認証
- AppSyncのエンドポイントにリクエストを送る際は、AWS Signature V4による署名が必要なため、設定してリクエストを送信します。
import { SignatureV4 } from "@aws-sdk/signature-v4"; import { Sha256 } from "@aws-crypto/sha256-universal"; async function createSignedRequest(query: string, variables: CreateDeviceStatusVariables) { const url = new URL(process.env.APPSYNC_ENDPOINT!); // リクエストの基本情報を設定 const request = { headers: { "Content-Type": "application/json", host: url.hostname, }, hostname: url.hostname, method: "POST", path: url.pathname, protocol: url.protocol, body: JSON.stringify({ query, variables }), }; // SignatureV4オブジェクトを作成し、リクエストに署名 const signer = new SignatureV4({ credentials: defaultProvider(), region: process.env.REGION || "ap-northeast-1", service: "appsync", sha256: Sha256, }); return { signedRequest: await signer.sign(request), body }; -
Axiosを使用したリクエスト送信
const response = await axios.post( `${signedRequest.protocol}//${signedRequest.hostname}${signedRequest.path}`, body, { headers: signedRequest.headers, } ); -
テストデータの生成
- デモンストレーション用に、ランダムなデバイスデータを生成する補助関数も実装します。
function getRandomNumber(min: number, max: number, decimals: number = 1): number {
  return Number((Math.random() * (max - min) + min).toFixed(decimals));
}

function getRandomDeviceId(): string {
  return `device_${String(Math.floor(Math.random() * 100)).padStart(3, "0")}`;
}
resource.ts
ここに関数の定義を記載します。
名前とエントリーポイントを記載すればOKです。
import { defineFunction } from "@aws-amplify/backend";

export const functionWithDataAccess = defineFunction({
  name: "data-access",
  entry: "./handler.ts"
});
backend.ts
作成したLambda関数をバックエンドのリソースとして追加します。
また、AppSyncのエンドポイントをLambda関数の環境変数に追加および、Lambda関数にAppSyncへのアクセス権限を追加します。
import { defineBackend } from "@aws-amplify/backend";
import { auth } from "./auth/resource";
import { data } from "./data/resource";
+ import { functionWithDataAccess } from "./functions/data-access/resource";
+ import * as cdk from "aws-cdk-lib";

const backend = defineBackend({
  auth,
  data,
+ functionWithDataAccess,
});

+ // AppSyncのエンドポイントを環境変数として追加
+ backend.functionWithDataAccess.addEnvironment(
+   "APPSYNC_ENDPOINT",
+   backend.data.resources.cfnResources.cfnGraphqlApi.attrGraphQlUrl
+ );

+ // Lambda関数にAppSyncへの権限を追加
+ backend.data.resources.graphqlApi.grant(
+   backend.functionWithDataAccess.resources.lambda,
+   cdk.aws_appsync.IamResource.all(),
+   "appsync:GraphQL"
+ );
これで実装が完了したので、環境に反映します。
環境反映
下記コマンドを実装します。
npx ampx sandbox
CloudFormationが実行されて、下記ログのようにFile written: amplify_outputs.jsonが表示されていれば作成完了です。
✨  Total time: 0.82s

[Sandbox] Watching for file changes...
File written: amplify_outputs.json
動作確認
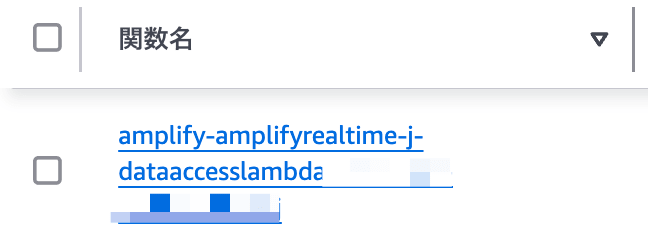
自動で作成されたLambda関数を実行します。
下記のように名前がdataaccessとついているものです。

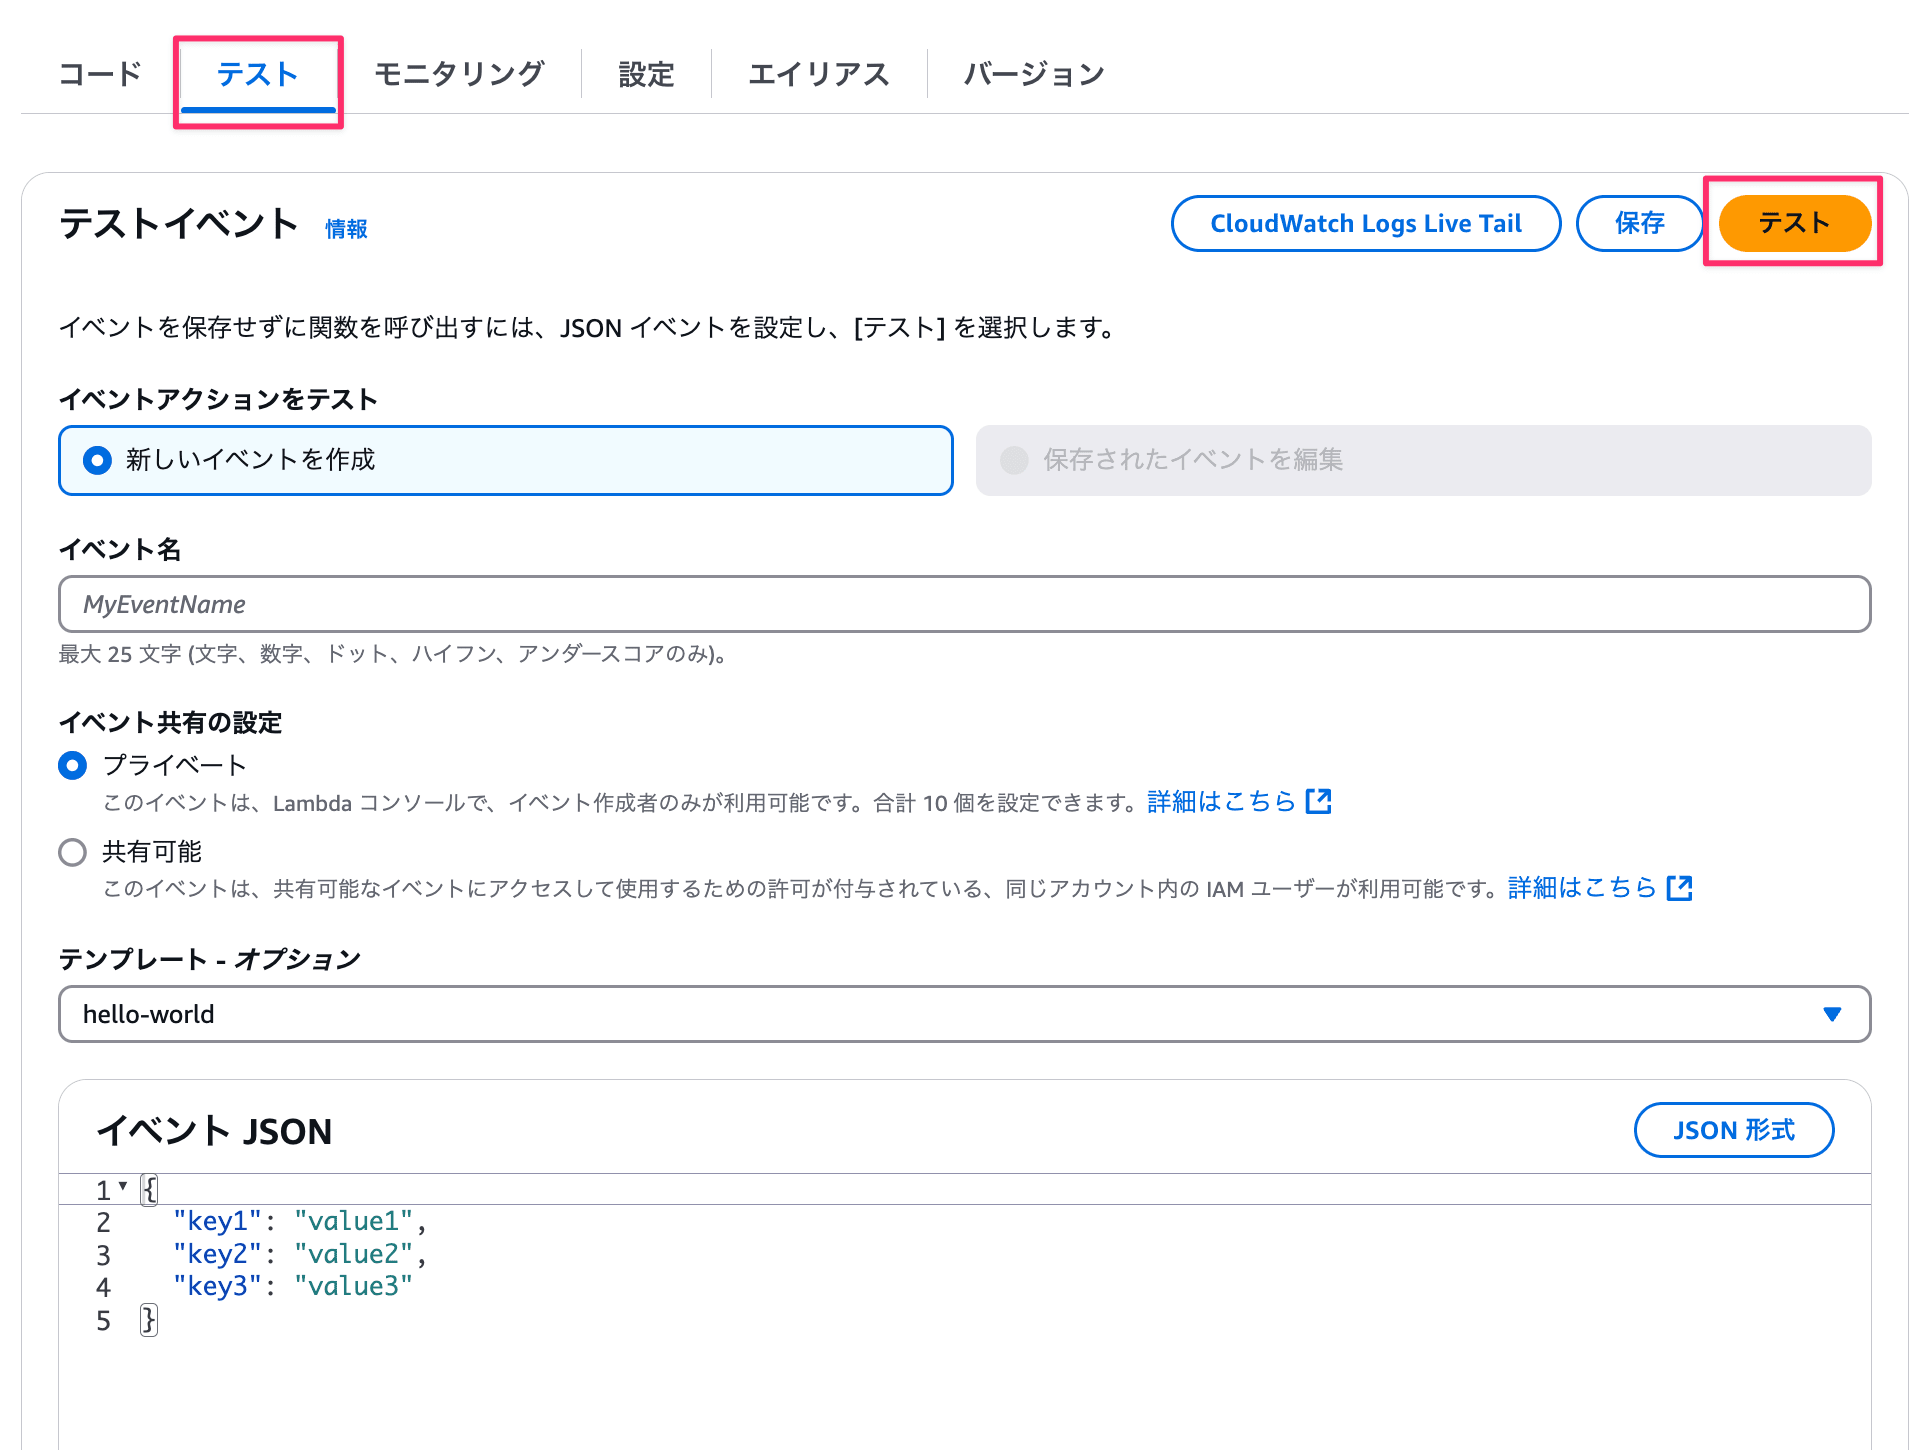
テストタブからテストを実行してみます。
また、データが追加されるのでリアルタイムで更新が反映されるか確認したいので、画面も起動しておきます。
実行コマンド
npm run dev
コンソール上の操作
テストタブを選択し、テストボタンを押下して関数を実行します。

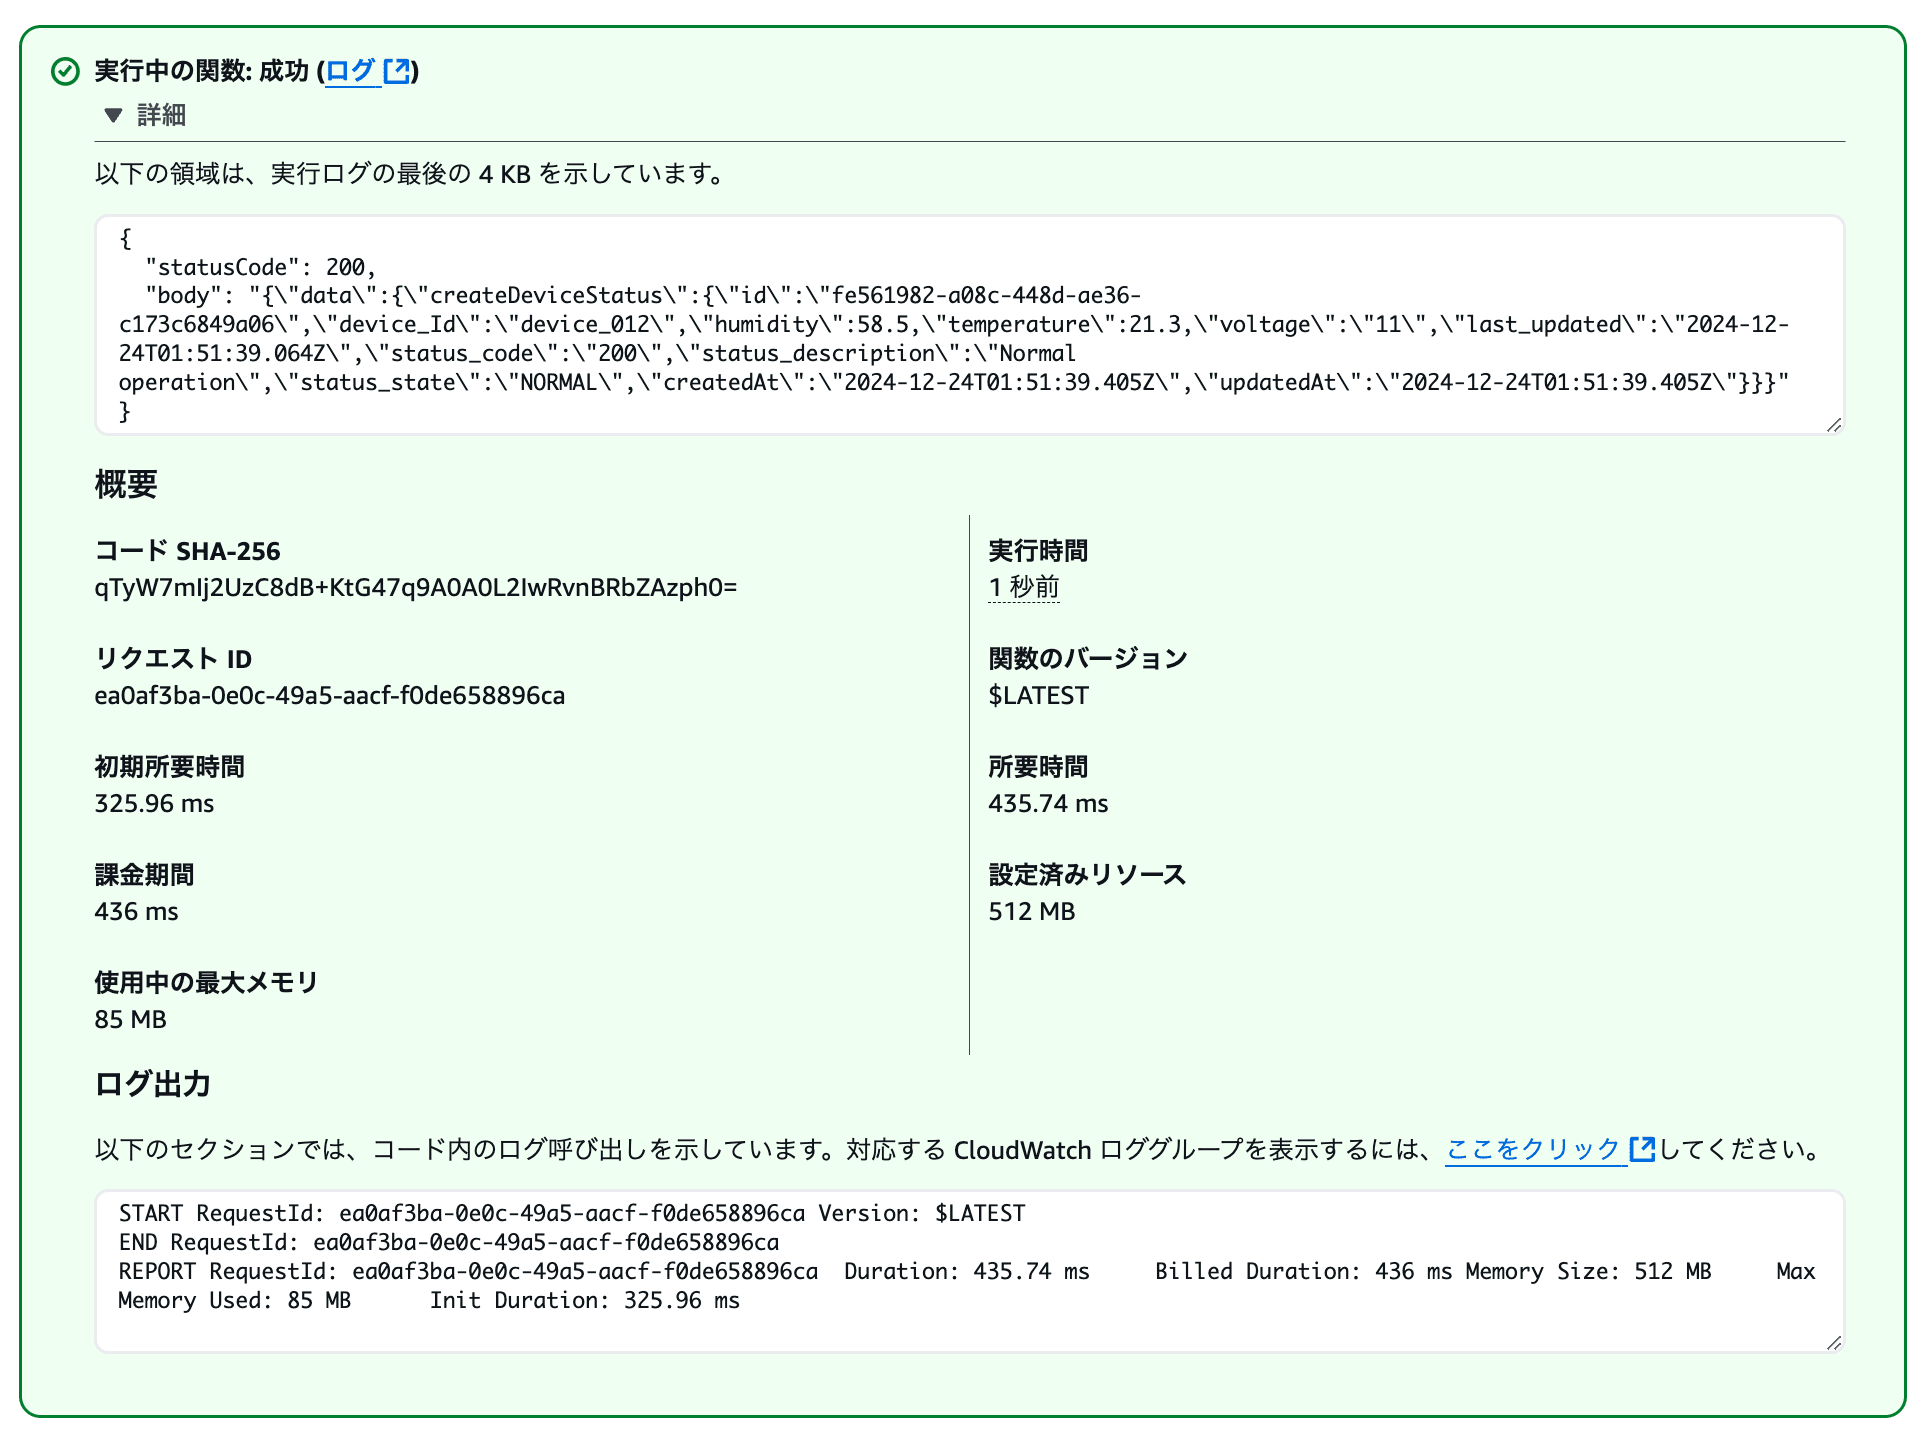
下記のように成功のログが出ていればOKです。
結果

ログ
{
  "statusCode": 200,
  "body": "{\"data\":{\"createDeviceStatus\":{\"id\":\"fe561982-a08c-448d-ae36-c173c6849a06\",\"device_Id\":\"device_012\",\"humidity\":58.5,\"temperature\":21.3,\"voltage\":\"11\",\"last_updated\":\"2024-12-24T01:51:39.064Z\",\"status_code\":\"200\",\"status_description\":\"Normal operation\",\"status_state\":\"NORMAL\",\"createdAt\":\"2024-12-24T01:51:39.405Z\",\"updatedAt\":\"2024-12-24T01:51:39.405Z\"}}}"
}
そして画面上でも下記のようにハイライトで該当のデータが追加されているか確認します。
無事追加されていればOKです!

おわりに
Amplify Gen2でLambda関数を作成しAppSyncのMutationを実行する方法はいかがだったでしょうか。
今回はLambda関数上でダミーデータを作成しましたが、Kinesis Data StreamsやIoT Coreと連携してデバイスデータなどを取り扱ってリアルタイムに連携できるケースもあるかと思います。
より具体的な使用例についても、今後ご紹介していきたいと思います!
本記事が少しでも参考になったら幸いです!最後までご覧いただきありがとうございました!

